Welcome to HReasily! This step-by-step guide will walk you through setting up your Malaysia-based company, adding employees, and running your first payroll. Follow the steps in order to ensure a smooth and successful onboarding experience.
Step 1: Set Up Company Information
Begin by entering your company’s core details:
1. Navigate to Company Info > Basic Info.

2. Fill in the following:
Company name
Business Registration Number
Registered address
3. Upload your company logo by clicking the Camera icon.

Optional: If you pay employees in a different currency, you may configure currency rates. Skip this if not applicable. 
Step 2: Configure Company Payroll Settings
1. Next, click on the Payroll Info tab to set up your company’s payroll configuration.
2. Click EDIT under Company Payroll Info.

3. Complete the following:
E Number (Employer Tax Number)
EPF & SOCSO Reference Numbers
Company Contact Person Details
MTD Calculation Method (we recommend Computerised)
Enable HRDF
- Bank Details → Check supported bank GIRO formats
Days in a Month Type (26 days or calendar days) → Learn more
Enable Cross-Month Payroll (if applicable) → Learn more
First Payroll Month
Optional: Show Year-To-Date (YTD) info on payslips → Learn more
⚠️ Important: Ensure your payroll cycle aligns with your actual pay schedule.

4. Click Save to proceed.
Step 3: Add Employees
You can add employees individually or in bulk.
Option A: Add Individually
1. Go to Staff Directory > Add Employee
2. Enter:
Personal Details: Full Name, Gender, DOB, Email
Residency Status
Mobile Number (mandatory if email is blank)
Address
Tick Will this employee be drawing salary?
Access Permissions → Learn more about permission levels here
3. After saving, you'll be directed to the Employee Payroll Info page. Fill in:
Payment Method and Bank Details
- Tax, SOCSO, EPF, HRDF, and Zakat details
- Payslip Notification → Learn more
- Employment Status, Salary and Working Schedule
Option B: Add in Bulk
1. Download the Employee Import Template
2. Fill in the required employee data.
3. Go to Staff Directory > Manage Employee > Add Employee
4. Copy and paste the data into the table.
⚠️ Tip: Paste column by column for better accuracy.

5. Click Save.
➡ View full bulk import guide here
⚠️ No seat quota left? This means you’ve hit your employee limit. Learn how to increase seats
Step 4: Set Up and Assign Pay Items
Before running payroll, ensure that all pay items are properly configured.
If the default pay items aren’t sufficient for your company’s needs, you can create custom pay items.
➡ Guide: How to configure pay items
If you're assigning tax-exempted allowances (e.g. travel allowance from Part F), be sure to use the preset pay items specifically created for this purpose.
➡ Learn how to assign tax-exempt pay items (e.g., travelling allowance)
Once your pay items are set up, assign them to the appropriate employees to ensure accurate payroll processing.
➡ Guide: Bulk assigning pay items
Step 5: Run Your First Payroll
Now that setup is complete, you’re ready to run your first payroll.
⚠️ Important: When transitioning from a previous payroll system, it’s advisable to run a parallel payroll for the first month to verify accuracy. If you're using computerised MTD (tax) calculation, ensure payroll details are backdated correctly for accurate tax. Refer to this guide
1. From the Dashboard, click Run Payroll.

Seeing "Manage Payroll" instead? That means your company payroll info isn’t fully set up. Refer back to Step 2 to complete it.
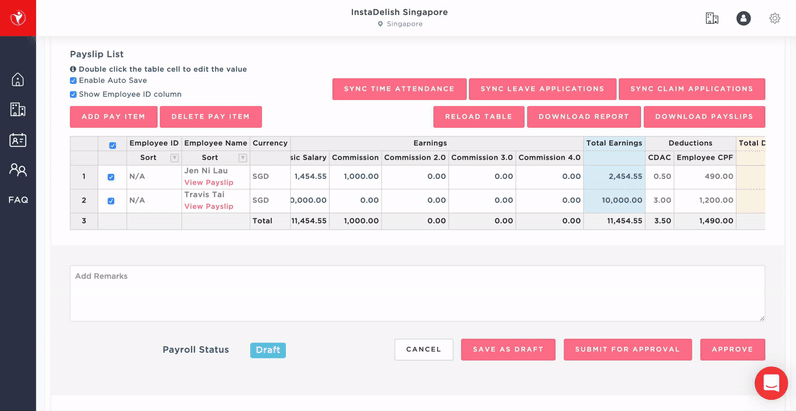
2. A draft payroll will be generated. Click Manage to review and edit the payroll.

3. Fill in the Payroll Basic Details:
Payment Date (shown on payslips)
Notification Date (when payslip emails/SMS will be sent)
Payslip Notification Message (optional message in email)

4. Review the payroll table. You may:
- Edit pay item amounts

- Click Reload Table if you’ve made changes to employee or payroll info

- Right-click a pay item > Add Comment to include remarks

- Click View Payslip to preview an employee’s payslip

- Export your payroll data in .xlsx format for easy review or sharing

5. Once confirmed, click Submit for Approval or Approve Payroll.
Congratulations! You’ve successfully processed your first payroll.
Step 6: Review Reports & Submit Statutory Contributions
Once payroll is approved, go to Manage Company > Payroll to access:
Troubleshooting Tips
Employee not showing in payroll?
→ Check join date and ensure salary is enabled. View guide hereGIRO file error?
→ Confirm bank details and file format.Unpaid leave not deducted?
→ Make sure the relevant settings outlined in this guide are set up correctly.
Was this article helpful?
That’s Great!
Thank you for your feedback
Sorry! We couldn't be helpful
Thank you for your feedback
Feedback sent
We appreciate your effort and will try to fix the article